개요
Spring AuthorizationServer를 사용하여 OAuth2 인증 서버를 구축하는 방법에 대해 알아보겠습니다.
Gradle 설정
implementation "org.springframework.security:spring-security-oauth2-authorization-server"Spring Boot를 사용하지 않는 경우 버전 정보를 명시해야 합니다.
application.yml 기존 설정
# 서버 포트 설정
server:
  port: 9000

# 로깅 설정
logging:
  level:
    org.springframework.security: trace

spring:
  security:
    # 유저 정보 설정
    user:
      name: user
      password: password
    oauth2:
      authorizationserver: # OAuth2 인증 서버 설정
        client:
          oidc-client:
            registration:
              client-id: "oidc-client" # 클라이언트 ID
              client-secret: "{noop}secret" # 클라이언트 비밀번호
              client-authentication-methods: # 클라이언트 인증 방식
                - "client_secret_basic"
              authorization-grant-types: # 인가 타입
                - "authorization_code"
                - "refresh_token"
              redirect-uris: # 리다이렉트 URI
                - "http://127.0.0.1:8080/login/oauth2/code/oidc-client"
              post-logout-redirect-uris: # 로그아웃 후 리다이렉트 URI
                - "http://127.0.0.1:8080/"
              scopes: # 스코프
                - "openid"
                - "profile"
            require-authorization-consent: true # 동의 요청 (자체 서비스에서 생략 가능)
로그인 테스트
서버를 실행하고 http://localhost:9000/에 접속하여 로그인을 시도합니다.
- 사용자 이름:
user - 비밀번호:
password
위 사용자 이름과 비밀번호로 로그인을 시도하면 home 화면으로 이동합니다.
Client 서버 설정
Client 서버에서는 application.yml에 다음과 같이 설정을 추가합니다.
spring:
  security:
    oauth2:
      client:
        registration:
          authorizationserver:
            provider: authorizationserver
            client-id: oidc-client
            client-secret: secret
            authorization-grant-type: authorization_code
            redirect-uri: "http://127.0.0.1:8080/login/oauth2/code/{registrationId}"
            scope: openid,profile
            client-name: sso-client
        provider:
          authorizationserver:
            issuer-uri: http://localhost:9000
테스트 서버를 실행하고 http://localhost:8080/에 접속하면 http://localhost:9000/로 리다이렉트되어 로그인 화면이 표시됩니다.
사용자 이름과 비밀번호를 입력하면 http://localhost:8080/로 리다이렉트되어 홈 화면이 표시됩니다.
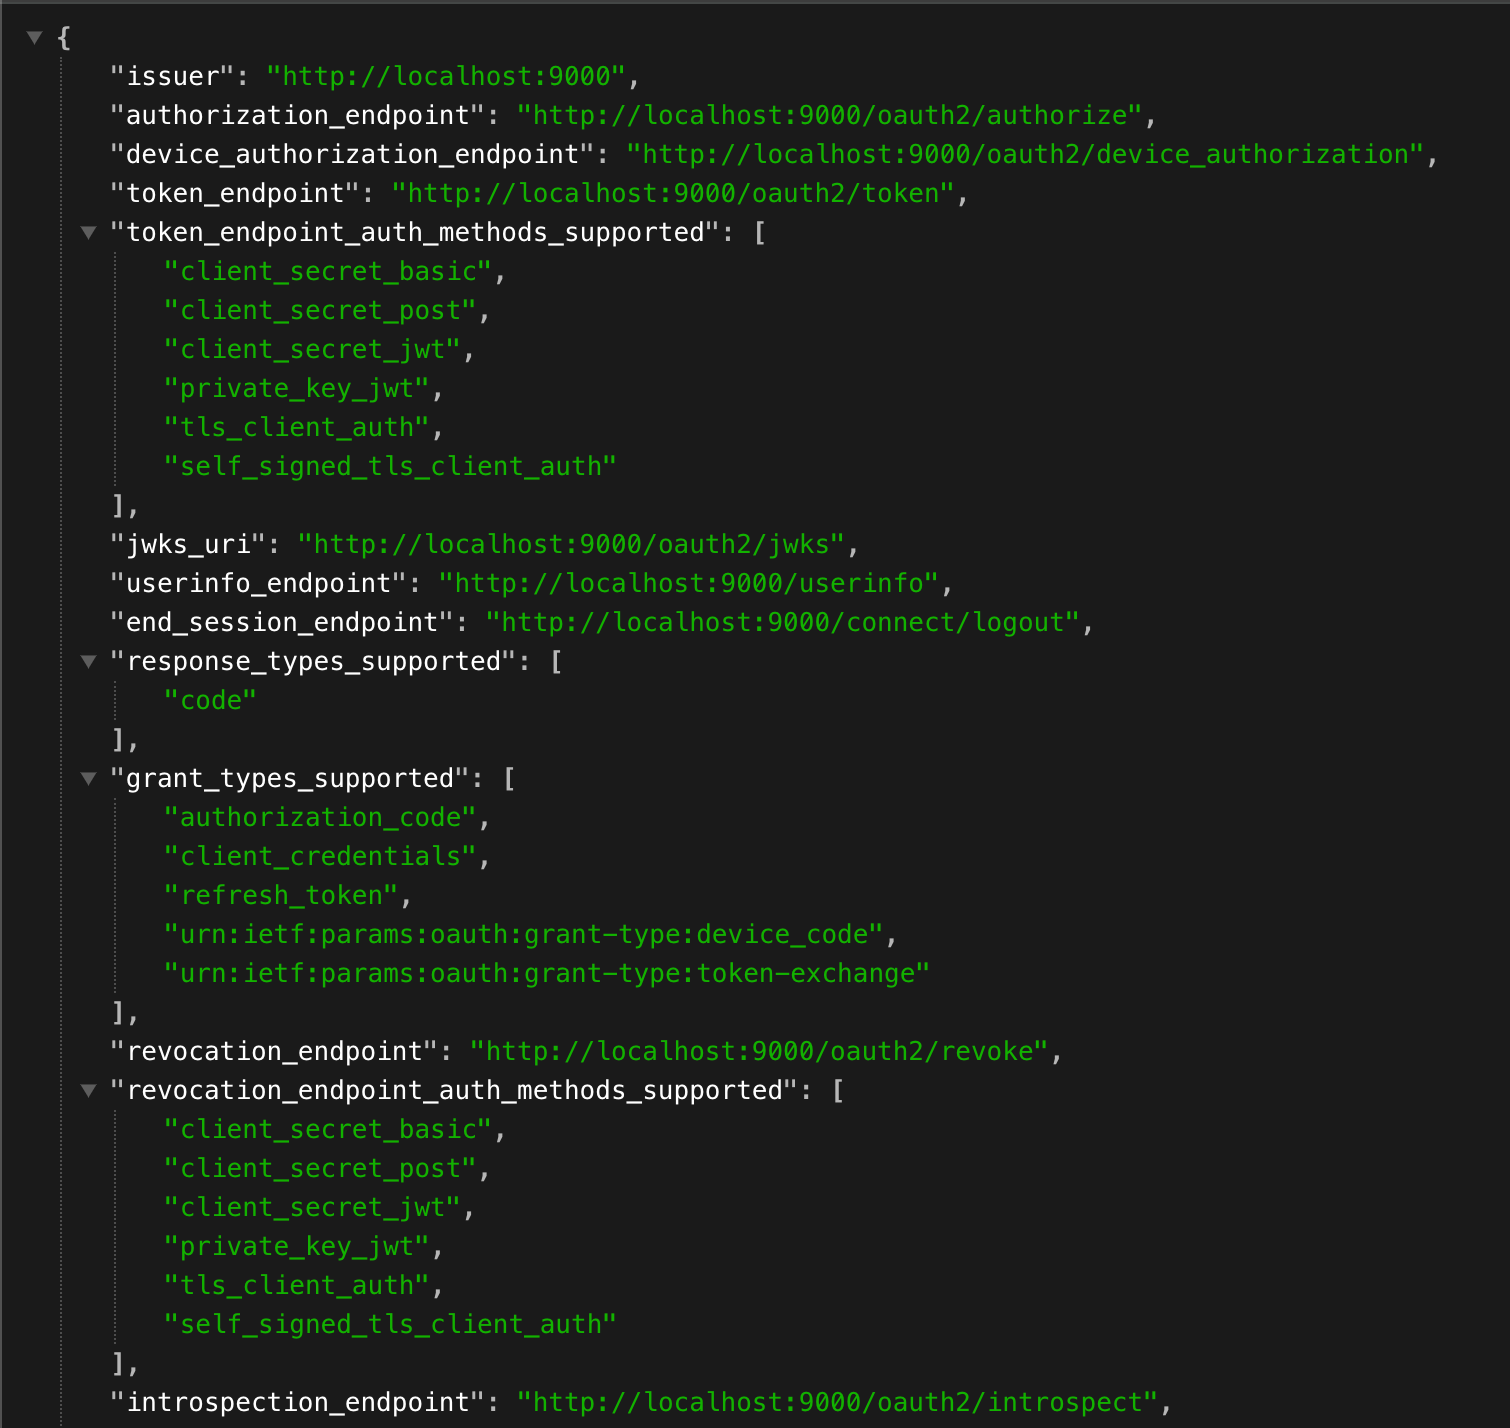
issuer-uri 를 확인
http://localhost:9000/.well-known/openid-configuration에 접속하여 issuer를 확인할 수 있습니다.
유저 등록 기능 구현
Spring AuthorizationServer에서 유저 등록 방법은 Spring Security에서 유저 등록을 위한 API를 생성하는 방법과 유사합니다.
다만, OAuth2 인증 서버 설정이 추가로 필요합니다.
JPA를 사용하여 유저 정보를 등록하는 기능을 구현해보겠습니다.
gradle dependency 추가
dependencies {
    // authentication server
    implementation 'org.springframework.boot:spring-boot-starter-oauth2-authorization-server'

    // oauth2 client
    implementation "org.springframework.boot:spring-boot-starter-oauth2-client"

    // security
    implementation 'org.springframework.boot:spring-boot-starter-security'

    // web
    implementation 'org.springframework.boot:spring-boot-starter-web'

    // lombok
    compileOnly 'org.projectlombok:lombok'
    annotationProcessor 'org.projectlombok:lombok'

    // test
    testImplementation 'org.springframework.boot:spring-boot-starter-test'
    testImplementation 'org.springframework.boot:spring-boot-testcontainers'
    testImplementation 'org.springframework.security:spring-security-test'
    testImplementation 'org.testcontainers:junit-jupiter'
    testRuntimeOnly 'org.junit.platform:junit-platform-launcher'
    testImplementation 'org.testcontainers:mysql'
    testImplementation 'org.testcontainers:junit-jupiter'

    // spring-restdocs
    testImplementation 'org.springframework.restdocs:spring-restdocs-mockmvc'

    // database
    implementation 'org.springframework.boot:spring-boot-starter-data-jpa'
    runtimeOnly 'com.mysql:mysql-connector-j'
}
Role Entity 생성
@Entity
@Table(name = "roles")
public class Role implements Serializable {

    @Id
    @GeneratedValue
    private Long id;

    @Getter
    @Column(nullable = false, unique = true)
    private String name;

    @Override
    public int hashCode() {
        return Objects.hashCode(id);
    }

    @Override
    public boolean equals(Object o) {
        if (this == o) {
            return true;
        }
        if (!(o instanceof Role role)) {
            return false;
        }
        return Objects.equals(id, role.id);
    }
}
RoleRepository 생성
public interface RoleRepository extends JpaRepository<Role, Long> {
    Optional<Role> findByName(String name);
}
User Entity 생성
@Getter
@Entity
@Table(name = "users")
public class User implements Serializable {

    @Id
    @GeneratedValue
    private Long id;

    @Column(nullable = false, unique = true)
    private String username;

    @Column(nullable = false)
    private String password;

    @Column(nullable = false)
    private boolean enabled;

    @ManyToMany(fetch = FetchType.EAGER)
    @JoinTable(
            name = "user_roles",
            joinColumns = @JoinColumn(name = "user_id"),
            inverseJoinColumns = @JoinColumn(name = "role_id")
    )
    private Set<Role> roles = new HashSet<>();

    public User() {
    }

    public User(String username, String password) {
        this.username = username;
        this.password = password;
        this.enabled = true;
    }
}
UserRepository 생성
public interface UserRepository extends JpaRepository<User, Long> {
    Optional<User> findByUsername(String username);
}
DefaultUserDetails 생성
@RequiredArgsConstructor
public class CustomUserDetails implements UserDetails {

    private final User user;

    @Override
    public Collection<? extends GrantedAuthority> getAuthorities() {
        return user.getRoles().stream()
                .map(role -> new SimpleGrantedAuthority(role.getName()))
                .toList();
    }

    @Override
    public String getPassword() {
        return user.getPassword();
    }

    @Override
    public String getUsername() {
        return user.getUsername();
    }

    @Override
    public boolean isEnabled() {
        return user.isEnabled();
    }
}
DefaultUserDetailsService 생성
@RequiredArgsConstructor
@Service
public class DefaultUserDetailsService implements UserDetailsService {

    private final UserService userService;

    @Override
    public UserDetails loadUserByUsername(String username) {
        var user = userService.findByUsername(username);
        return new CustomUserDetails(user);
    }
}
DefaultSecurityConfig 설정
@EnableWebSecurity
@Configuration(proxyBeanMethods = false)
public class DefaultSecurityConfig {

    @Bean
    public PasswordEncoder passwordEncoder() {
        return new BCryptPasswordEncoder();
    }

    // OAuth2 인증 서버의 설정을 처리하는 필터 체인 설정기를 생성합니다.
    @Bean
    @Order(Ordered.HIGHEST_PRECEDENCE)
    public SecurityFilterChain authorizationServerSecurityFilterChain(HttpSecurity http)
            throws Exception {
        // OAuth2 인증 서버의 설정을 처리하는 필터 체인 설정기를 생성합니다.
        var authorizationServerConfigurer = OAuth2AuthorizationServerConfigurer.authorizationServer();

        // OAuth2 인증 서버의 엔드포인트와 일치하는 요청만 필터링하도록 설정합니다.
        // 이를 통해 인증 서버의 엔드포인트에 대한 요청만 해당 필터가 처리하도록 합니다.
        return http
                // OAuth2 인증 서버의 엔드포인트에 매칭되는 요청만 처리합니다.
                .securityMatcher(authorizationServerConfigurer.getEndpointsMatcher())
                .with(
                        // OAuth2 인증 서버의 설정을 처리하는 필터 체인 설정기를 적용합니다.
                        authorizationServerConfigurer,
                        // OpenID Connect 1.0을 활성화하여 ID 토큰 발급을 지원합니다.
                        authorizationServer -> authorizationServer.oidc(Customizer.withDefaults())
                )
                .build();
    }


    // 기본적인 보안 설정을 처리하는 필터 체인 설정기를 생성합니다.
    @Bean
    public SecurityFilterChain defaultSecurityFilterChain(HttpSecurity http) throws Exception {
        return http
                // 모든 요청에 대해 인증을 요구합니다.
                // POST /api/users, POST /login 엔드포인트에 대해서는 인증을 요구하지 않습니다.
                .authorizeHttpRequests(request -> request
                        .requestMatchers(HttpMethod.POST, "/api/users", "/login").permitAll()
                        .anyRequest().authenticated())
                // CSRF 보호 기능을 비활성화합니다.
                .csrf(AbstractHttpConfigurer::disable)
                // 폼 로그인을 활성화합니다.
                .formLogin(Customizer.withDefaults())
                .build();
    }
}
UserService 생성
@RequiredArgsConstructor
@Service
public class UserService {

    private final UserRepository userRepository;
    private final PasswordEncoder passwordEncoder;
    private final RoleRepository roleRepository;

    public void register(String username, String password) {
        if (userRepository.existsByUsername(username)) {
            throw new IllegalArgumentException("User already exists");
        }
        var user = new User(username, passwordEncoder.encode(password));
        user.getRoles().add(roleRepository.findByName("USER"));
        userRepository.save(user);
    }

    public User findByUsername(String username) {
        return userRepository.findByUsername(username);
    }
}
UserRegisterRequest 생성
public record UserRegisterRequest(String username, String password) {

}
UserController 생성
@RequiredArgsConstructor
@RestController
public class UserController {

    private final UserService userService;

    @PostMapping("/api/users")
    public ResponseEntity<Void> register(@RequestBody UserRegisterRequest userRegisterRequest) {
        userService.register(userRegisterRequest.username(), userRegisterRequest.password());
        return ResponseEntity.ok().build();
    }
}
Role 초기화
@Component
@RequiredArgsConstructor
public class RoleInitializer implements ApplicationRunner {

    private final RoleRepository roleRepository;

    @Override
    public void run(ApplicationArguments args) {
        roleRepository.save(new Role("USER"));
        roleRepository.save(new Role("ADMIN"));
    }
}
이로 인해 유저 정보를 등록할 수 있는 API가 생성되었습니다.
POST /api/users에 username과 password를 전송하면 유저 정보가 등록됩니다.
결론
이번에는 Spring AuthorizationServer를 사용하여 OAuth2 인증 서버를 구축하는 방법에 대해 알아보았습니다.
또한, JPA를 사용하여 유저 정보를 등록하는 방법에 대해 알아보았습니다.
다음 에는 OAuth2 인증 서버의 로그인 form을 커스터마이징과 다른 client 서버(google, kakao)와 연동하는 방법에 대해 알아보겠습니다.
참고
'Spring' 카테고리의 다른 글
| Social 로그인 구현 (Spring Security) (1) | 2025.01.25 |
|---|---|
| mkcert, Spring Boot를 사용하여 Localhost에서 HTTPS를 사용하는 방법 (0) | 2025.01.15 |
| GitHub Repository에 Coveralls 배지 적용하기 (0) | 2024.09.11 |
| Rest Docs의 템플릿 커스터마이징 (2) | 2024.09.11 |


댓글